What does this do? This is a really basic danka tool/script for Maya that will select joints for exporting for 3arc and IW.
This tool with add 1 shelf/tab to your Maya screen named "Scoba", under that there are 3 buttons:
The ones with a label will select normal joints for the respective games. The ones with the label "ADS" will select ADS joints.
The one labeled "JOINT" will delete unnecessary tags in IW Worldmodels for red dot, etc.
Why not just select/delete them myself? When doing a batch of anims/models you really just want to get it done nice and fast. This saves me time when I got export each anim all I need to do is press a button instead of selecting joints, then Select Hierarchy, etc.
For the worldmodel deleter it's equally as tiresome when doing multiple LODs to delete each tag except tag_weapon, brass, and flash, this does it at the click of a button.
What's the point if I can just get Lemon 1.42 and get xanims? 1.423 is the only version that will work with Ghosts and thus you still need to convert tanims for it. The 3arc side of the script was only added for convenience and in case some people want to export a batch of modified anims.
Installing All you need to do is navigate to Documents\Maya\*Your Maya Ver", open the archive in the download and copy the prefs folder inside the "Your Maya Ver" folder to yours.
Then, open the file in the prefs/shelves's folder called "shelf_Scoba" with a program that has a "Find/Replace" features, and replace:
Code Snippet
Plaintext
YOUR_MUMS_USERNAME
With your username, which is probably indeed your mum's since you're using her laptop of course!
So I added a little underground area, however the water for some reason still reflects the sun, even though it is not in view of the sun:
I even tried add this above it:
Still same thing. Is it possible to fix this or is it another shitty thing with CoD 5's engine? I can live with it, but if anyone has info I'd appreciate it.
This tutorial is only intended to be used with Harry Bo21's perks.
If you're like me and like to make it possible for players to get all or more than 4 perks sometimes you'll find it can get really cluttered at the bottom with all the perk icons spread across the screen or if you use vertical it can get hard to see them at the side.
My solution was to stack them as seen in the above screenshot, they look really nice and neatly tucked away in the corner and don't hinder the players view or look messy. Go to root\mods\maps and open _zombiemode_perks.gsc in a text editor of some sorts.
Find the function harrybo21_perks_hud_set(), it should look like this:
And that's it! Vulture Aid for whatever method Harry done with it from testing will show up at the position the shader is in regardless. If there are any issues please let me know.
FAQ:
Spoiler: click to open...
Q: Bad Syntax. A: Do it again.
Q: Can be done better. A: I don't care.
Q: You stole this. A: Piss off.
Q: Shader doesn't show up correctly. A: Do it again.
This uses a hefty bit of FX, prepare yourself for sp00ki FX error m80.
This will play FX based on how much ammo you have on the weapon. Make sure to download first from the bottom of this post. I have also included some info (probably not the best explained) on using another weapon, maybe from Titanfall, etc. as some of them have on weapon displays.
I have included the following:
Script
Rig
FX
It's pretty nice to have, and if you want you can modify this for many other things, including using it with other weapons.
Adding the Scripts Make sure to copy the stuff from the IWD to the respective folders, root\mods\modname\clienscripts folder should go into your mods folder, and make sure to tick it. Ignore the rig folder for now.
First off, open your mapname.csc in root\mods\modname\clientscripts, if it's not there, copy it from root\raw\clientscripts.
And that should be it. Let me know if you run into any issues with the FX or script. If I forgot to include something let me know, I probably did, lol.
For using with your own weapon read the README.h, open in program like Notepad++ for easier reading, I am not good at writing up tutorials like that so it's possibly not explained well, if you need assistance with it contact me.
Credits: Lilrifa: Assistance with FX HitmanVere: Assistance with FX Soyo: Number Splitting
Spoiler: click to open...
If you want to claim I "stole" something belong to you do so via PM, I want full proof, and stealing an engine function isn't proof.
I know you're trying to help but please don't respond with "x should have done like y", I release this to help, not to be criticized, and it works, so that's all I care about.
So I've been porting the BO1 Nova Crawlers* (edit), and somewhat success, but for some odd reason, he will not go for me.
He just stands there like this:
His anims seem to be working, since when another spawns, he goes to quad anims, and when he dies.
The only errors I'm getting are could not find goal thing.
I also tried setting the spawners in _zombiemode_spawner to his, which again makes him spawn, only with normal zombies anims and still doesn't go for me.
I can't really send the script, since it's Bo1, but essentially the only edits I haven't really done much to it, only lilrifa edited it to WaW animscripts.
Here's the aitype set up:
KVPs:
I would appreciate any help, this is my first time going anywhere near AI scripts so I'm not really too educated on them, so go easy on me.
On and off I've spent the last month or so figuring out how to extract sounds from Ghosts. I can't find an exporter nor can I find any info on the FFs. So I just decided to figure it out myself.
NOTE: There is no guarantee you can get the sounds with this method, but you have a fairly good chance. I was able to extract sounds including fire, clip ins, etc. for Bulldog and Magnum.
This tutorial is a little full on so take it step by step, if you need assistance I'm usually on Chat of just ask here. Don't look at it and think 2 complex 4 me, it really isn't. If I the idiot could figure it out you can follow these instructions. If you think I've gone wrong anywhere here please let me know, pretty sure I didn't skip any parts as I pretty much typed as I ported the sound.
You don't need to understand hex, basic knowledge is all we need, if you're able to open and close a program, you're fine. Decompiling the FF To begin, we're going to need to decompile the FF. This involves determining which FF the gun sounds are in, I usually go by SP ones if the gun is in SP since I find it easy because fewer weapons are in one level, your preference, if it's in MP only (including DLC ones) make sure to use MP ff's.
I'm going to rip the sounds for the Bulldog, note that make sure to go on Wiki and find out the name of the gun in game files, the Bulldog for example is referred to as Maul, not Bulldog. The Bulldog is in a few levels, but I am going to extract it from No Man's Land aka nml.ff.
So open FF Viewer 3.0 and drop the FF onto it, it will take a bit to extract, so be patient and wait until it exports fully, if you get any errors let me know, but I haven't got any yet.
If it says success, great, leave it open until we're done.
You should now have this file in the same folder as the FF:
Now we can move onto getting the sounds.
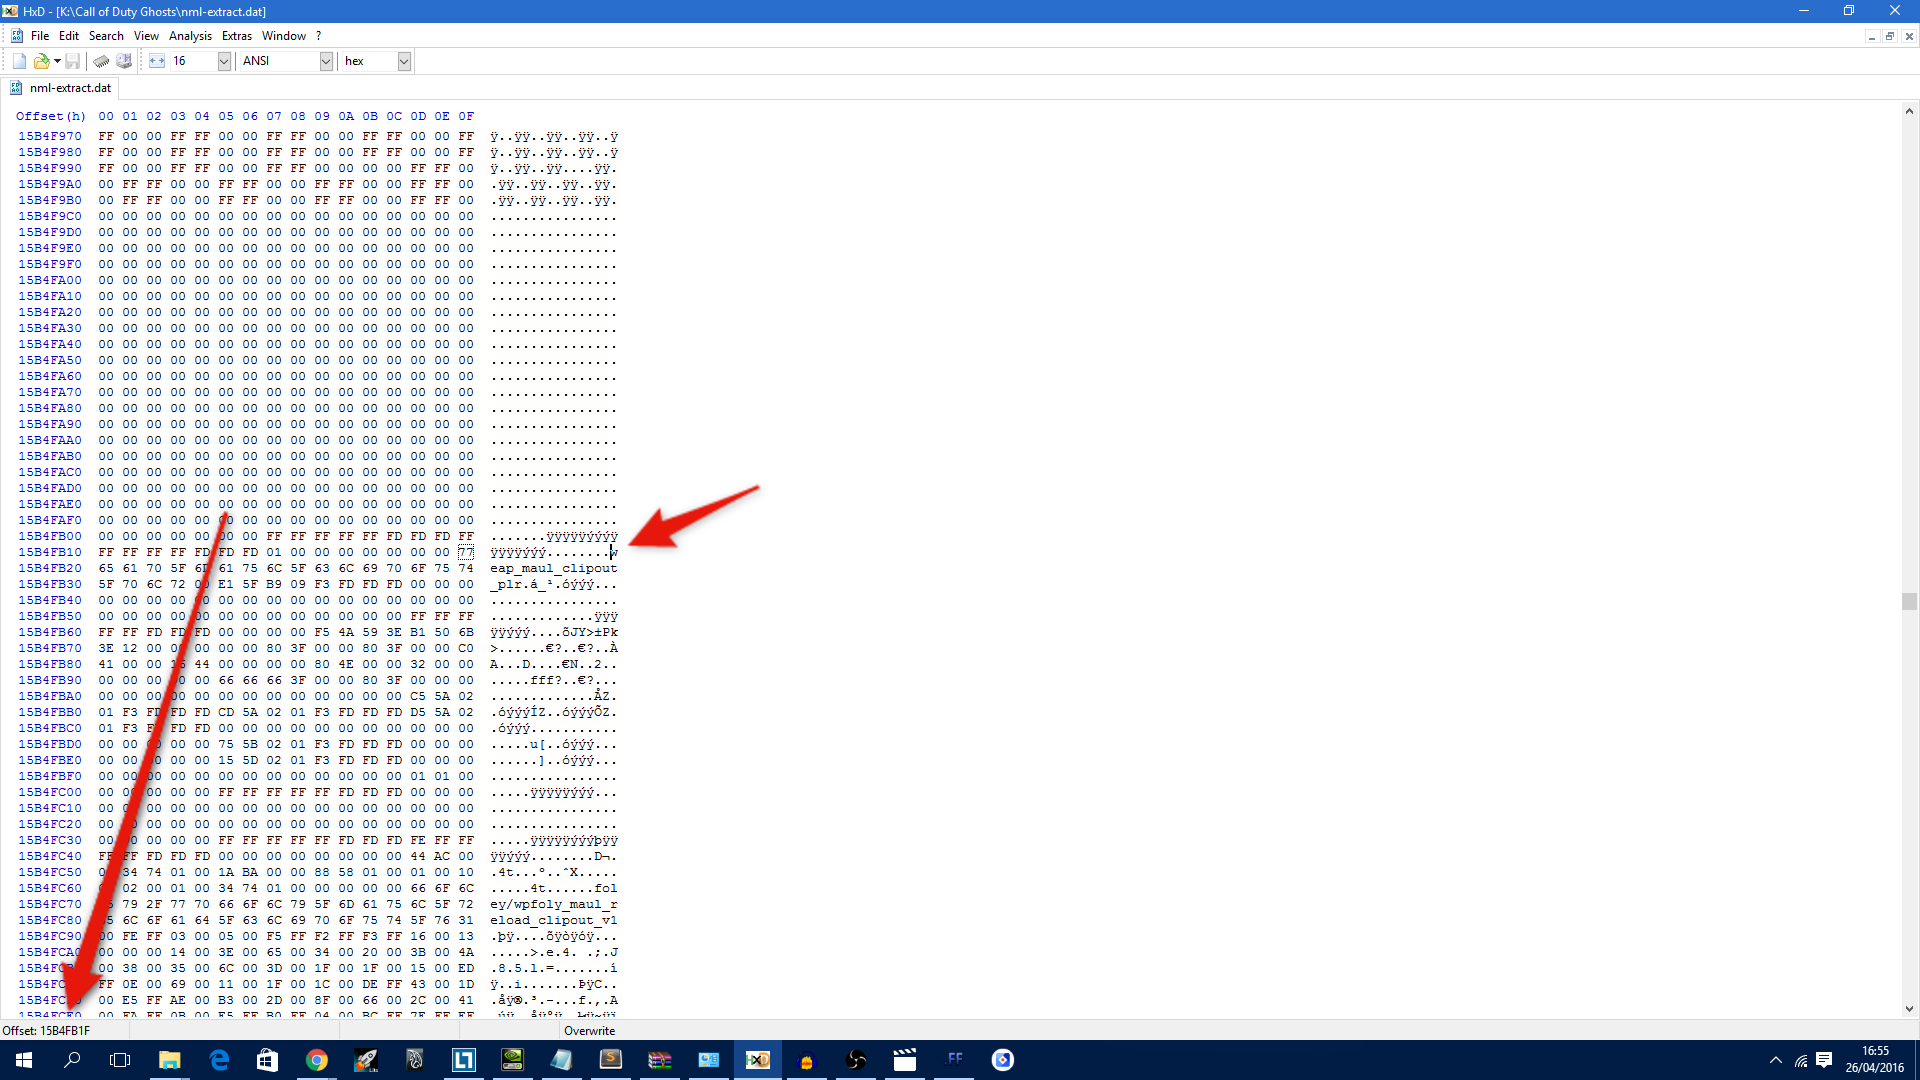
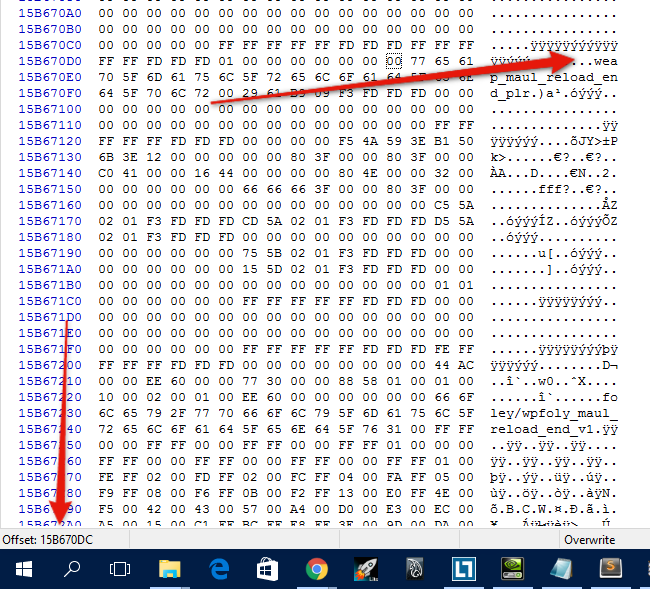
Ripping the Sounds This is where it gets bit confusing maybe, and requires some thinking. Open the .dat file in HxD and it should look similar to this (not 100% exact obviously):
Try not the get confused, k? So let's search for the sound, remember I told you to take note of the weapons in-files name? Press CTRL+F to search and search for it.
You'll probably run into this stuff:
Ignore them and press F3 to skip to another entry, they are joint names probably, possibly for anims/models. Also skip ones with mtl_, nrm, col, spc etc. in the name, materials ant texture names. Also stuff like _lod. I usually find the audio section of the .dat to be located about below mid-way with the slider at the side.
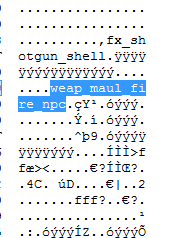
Go until you find something named simialr to this, with npc, plr, etc. at the end, as this is probably a soundalias name, we are getting close.
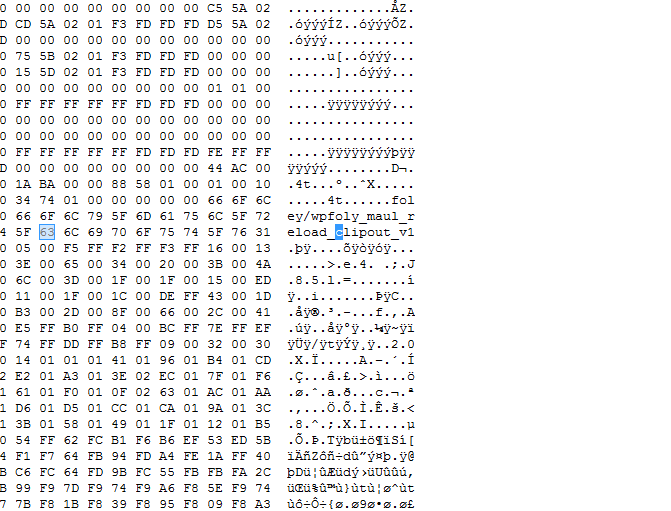
Now keep skipping these, as we don't need them, but they give us an idea of where we are, wait until we get down to something like this:
This is probably a sound, put the cursor after the dot at the end and take note of the offset.
Now since the alias and sounds are usually jumbled together in this, do another search for your weapon to bring you to the next entry, which as we see is probably an alias, take note of the part before the alias name like we done with the dot after our sound name.
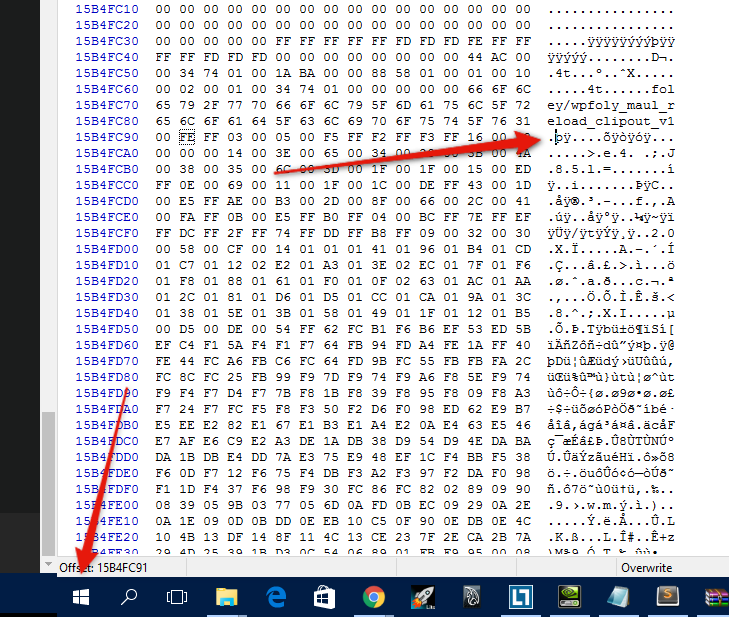
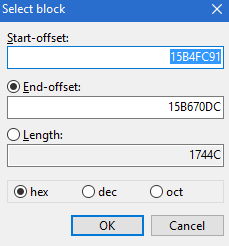
Now with the 2 offsets you've taken note off, press CTRL+E or Edit>Select Block, this will allow us to select the entire section that is possibly the audio.
We shall enter the first offset we took into the Start, and the last on, into the End and press Ok, this will select the entire block like so:
Now copy this, if you copy too much don't worry, we can always chop it off in Audacity.
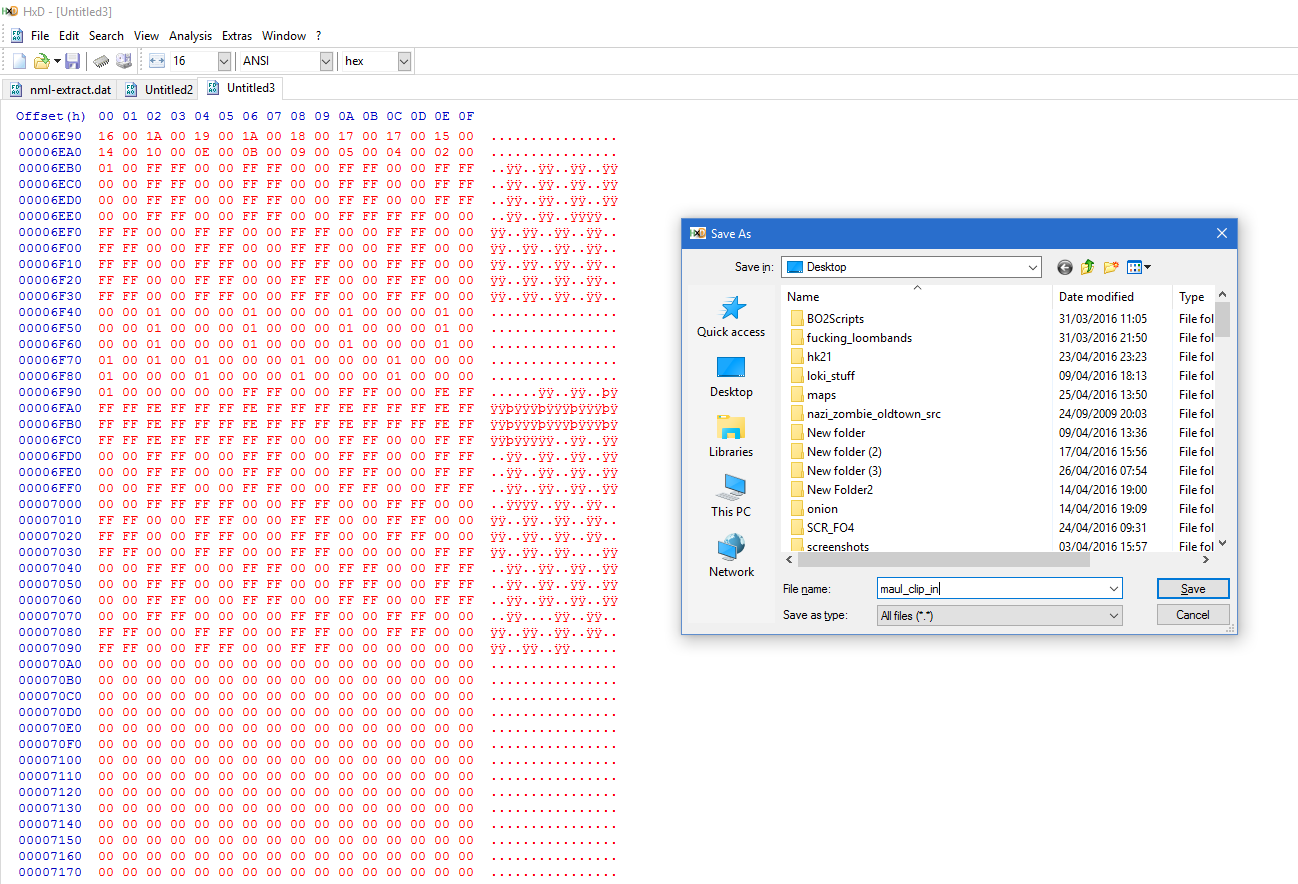
Now make a new file in HxD and paste it in, if it gives a warning about File Size being bigger, press Ok. Now you can save this to where ever, file extension doesn't matter either.
Now you can keep repeating this step for different sounds, like this is clip in, we can do another search for clip_out, fire etc.
Just another demonstration with a bit less detail:
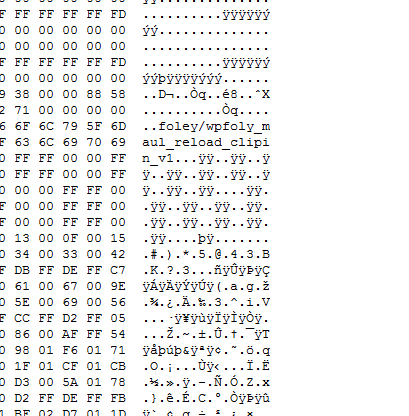
From where we are, search again for what might look like a sound, again, keep going until you find it (usually reload sounds will be foley/soundname and it is probably only a few lines under our first block for the clip in):
Take note of the first offset, the dot after the name:
Then search again, and take note of the offset of the dot before this alias name:
Then select the block like we done before:
And paste into a new file and save.
Do that for whatever sounds you want.
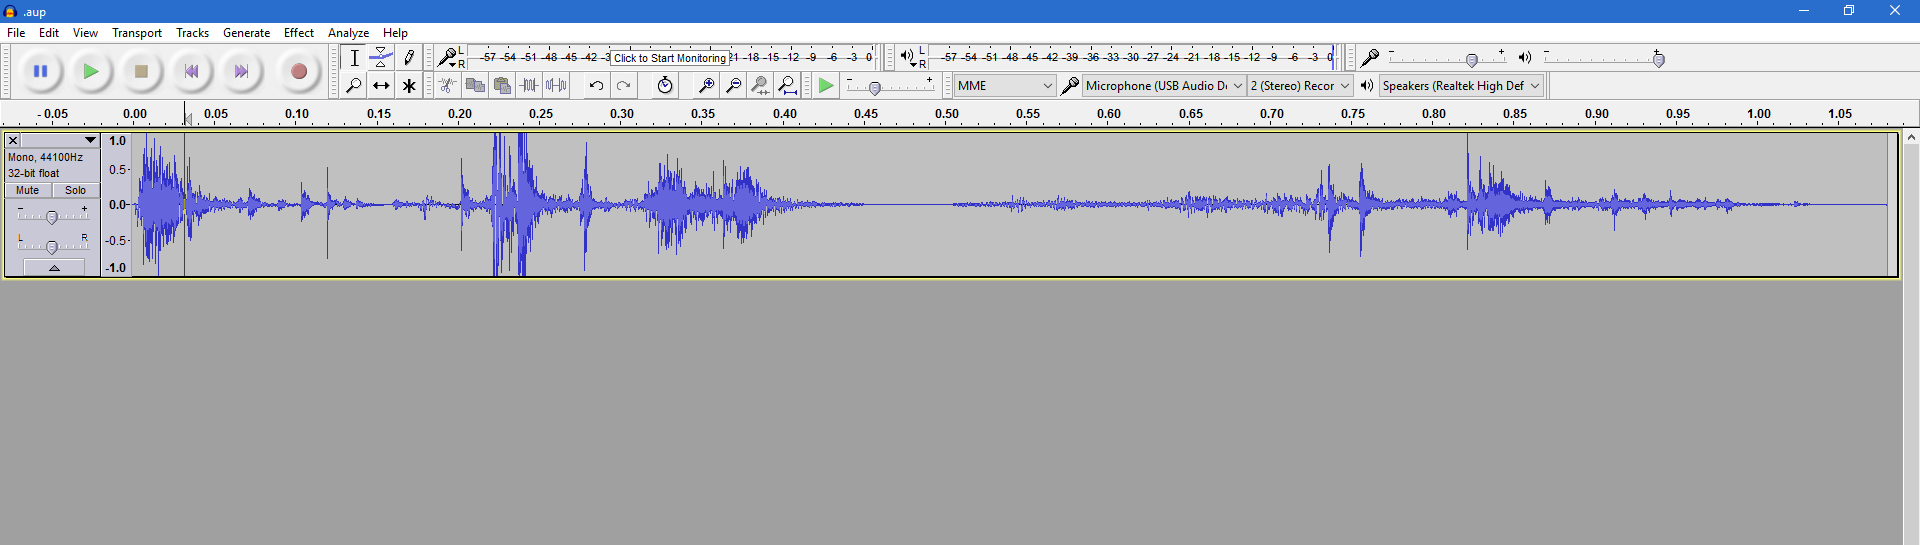
Now once you're done, we can move onto importing these files into Audacity
Importing the Sounds This is by far the easiest part. Just open Audacity, go to Import>Raw Data and select the file to import:
Once that's done assuming you done it right, it should work. After that it's just exporting it to WaW, which you can learn about in another tutorial (Zeroy's Wiki has some good tuts for sounds for both IW3 and T4).
Do not ask for sounds on this thread, happy modding, enjoy your sounds if you are successful with it, make sure to trim off any bad sound if there is some.
Credits:
R00feR: Assistance and Tips Developers of FF Viewer: FF Viewer IW: Dirty bastards making our modding lives harder.
I took inspiration from UGX Mod for this, it will essentially maintain the FOV when aiming, so if you're FOV is set to 65, when you aim, it will still be 65, instead of 45 or whatever weaponfile has it set to. Note: I take the assumption you have ADS FOV is set accordingly, if it's set higher than current FOV, this won't work.
As always, I recommend downloading something like Notepad++ and enabling Syntax Highlighting (Wiki has tut for this), click here to download it.
Go to root\mods\modname\clientscripts and open mapname.csc, if it doesn't exist make one, and go to root\raw\clientscripts, and copy it from here to the folder in mod.
Once here, got to the bottom of the csc, and add this:
Note: If you have this enabled ingame, and decide to lower your FOV through a slider or similar, the effect won't be seen while paused, the fov will set once you leave the menu, this same effect is not seen when increasing the field of view.
I've noticed on many Ghosts weapons I've ported, most the weapon seems to be rather...dark...here's the SVU for example:
As you can see, it is rather dark, however if I look slightly away from any Primary Light it looks fine:
Here's the PDW-57 for comparison:
As you can see, it looks fine. I haven't converted the SVU, CBJ, etc. any different, which makes me believe it has something to do with the model, I've tried changing assman settings, reversing normals, etc. but no avail. I'm hoping someone can shed some light on this dreary weapon.
A max ammo should be a "max ammo" and since I liked in maps like Hotel V2 that it fills your clip I decided to just make a small edit to my powerups gsc to do it which I will also show you guys how to do.
First go to root\raw\maps and copy the _zombiemode_powerups.gsc to your mods maps folder, usually in root\mods\modname\maps. If the maps folder doesn't exist, create one.
Next we need to open it with a text editor, something like Notepad++ or Sublime text is preferred.
I am working on a Dual Mag script which appears to be working but I've run into an issue.
When it came to playing a different anim when they had 0 bullets I decided to use forceviewmodelanimation and set it to reload, which would be the dual_mag_empty anim.
It works, but for some reason after it switches back to my original weapon I can't shoot for 1 or so seconds.
Shooting and reloading when there is ammo in weapon works no issues, but if it's reloading empty with the dual mag anim, it freezes the gun for a few seconds.
Any info would be appreciated, if I can't get it to work I can just use same dual mag anim.
I've been trying this for ages last night and still can't seem to get it (I am new to programming/scripting/coding, etc. in general tho.), in short I am looking to replicate this:
(no, not the actual M14 icon some in chat thought I was on about, I can get that with iPak exporter by Tom)
I could just make a trigger in Radiant and work with that but this is way too inefficient and I fear I'll run into getting closer to g_spawn if I start doubling how many ents are used for weapon buys.
I have tried several things, including getting the script_noteworthy of the gun, the weapon name, etc. in _zombiemode_weapons.
My idea is to have it get the script_noteworthy of the weapon or the weapon name defined in add_zombie_weapon() and then based off that have a material witht he same name to display, either through GSC or Menu with DVARs, so for example it would get script_noteworthy of let's say m1911 and then a material would be set up called m1911 and it would set that.
I'm new to scripting like I said so do excuse my ignorance, this could be something so easy and I'm making doggies dinner out of it, I understand for scripters it's probably easier to just give me a direct script and leave it at that but if possible I would appreciate if you do answer this to explain how it's done, etc. all in effort to improve my scripting skills so I don't have to come back that often.
Set-up thread showed some pretty nice set ups you guys have. Let's step it up a notch and show off your PC rig!
All you have to do is take a pic of your PC with the side panel off. Pre-build, Custom Built, Onion Build, HitmanVere Build, we don't care! We want to see your un-managed cables!
If you want to give a little note with it or give feedback to others go for it!
I'll start it off!
My first "gaming" PC, since I wanted to go cheap but still relatively powerful I went with older parts, 570, etc. which still runs BO3 at 1080p at around 40-60FPS. Cooling is fairly good, GPU doesn't go above 65 degrees C. with a 10-20% OC.
Zombie Garage is on the modified one. Zombie Garage no work because something is causing it in raw to not work, me want to move Zombie Garage to another install.
So is there a program that can move any custom assets that are associated with a map to another install of mod tools? Tom's tool works but only moves images and materials, etc. but not xmodels and still have a lot of xmodels need to be moved.
 Show Posts