UGX-Mods Login

or login with an authentication provider below
Sign In with Google
Sign In with Twitter
Sign In with Discord
Sign In with Steam
Sign In with Facebook
Sign In with Twitch

[TUT] How to make normal, specular and cosine power maps for custom textures

broken avatar :(
Created 9 years ago
by johndoe
0 Members and 1 Guest are viewing this topic.
9,861 views
broken avatar :(
×
broken avatar :(
Location: tr
Date Registered: 1 March 2013
Last active: 4 days ago
Posts
816
Respect
Forum Rank
The Decider
Primary Group
2015 Contest Winner
My Groups
More
My Contact & Social Links
More
Personal Quote
Caw caw caw
×
johndoe's Groups
Donator ♥ Benevolent Soul who has our eternal gratitude and exclusive access to betas and the donator section of the forum.
Community Mapper Has released one or more maps to the UGX-Mods community which have been added to the UGX Map Manager.
2015 Contest Winner
johndoe's Contact & Social Linksmyc153-johndoe
After seeing people complaining about the looks of the ported weapons on custom maps, I realized some custom maps doesn't only have bad looking textures on weapons, but they also have bad looking textures on brushes and etc. You'll need the following stuff to make normal maps, specular maps and cosine power maps for WaW. Since the plugins' readme files explain how to install them, I won't be covering those steps.

- Gimp http://www.gimp.org/
- Normal map plugin for Gimp https://code.google.com/p/gimp-normalmap/

- Generating the normal map

Just open or import the color map on Gimp. Go to Filters -> Map -> Normal Map


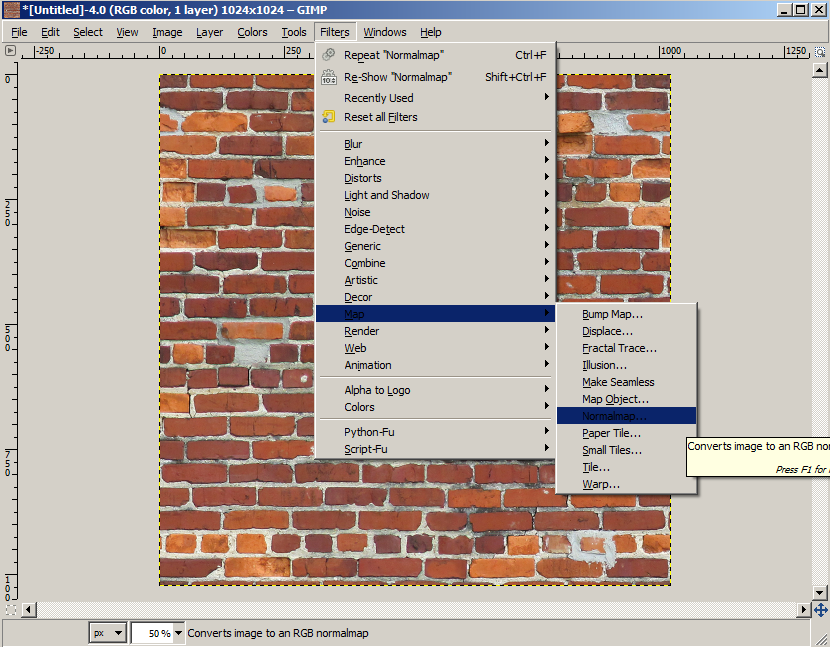
You'll see a window that shows options for the normal map it's gonna generate. Click 3D Preview to see how it'll affect the texture in game. Change the shape to sphere on options. You can move the lights too.


You may need to change the filter to adjust the sharpness and invert X and/or Y axises. When you're satisfied with the looks of the 3d preview, press OK and export the generated normal map as a TGA image.

- Generating the cosine power map

If the texture has too many areas that shouldn't reflect ligts, it's best to use the normal map to generate the cosine power maps. You can also use the colour map to generate the cosine power map. To do that you'll just need to do what's written in the parentheses on the second step.

Import the normal map into gimp. Go to Colors -> Colorify, select white and press OK. (you can also do this by converting the image to grayscale, but there's a chance of fucking it up when grayscale is used.)


Go to Colors -> Invert (you may probably not need to invert the colours if you're using the colour map to generate the cosine power map)


Go to Colors -> Brightness & Contrast


You'll need to adjust the brightness and the contrast to make the image darker or lighter depending on how you want the cosine power map to look.


Since what the cosine power maps basically do is to show the engine which parts of the texture will shine, the image below will do a decent job for the texture i'm using.


Note: I know some of you might think it's stupid to use the normal , but based on my experience, generating the cosine power maps using the normal sometimes gives you better results on some textures. For example, if you generate the cosine power map by converting the color map to grayscale and darkening it, it'll make the cracks shiny too; but if you generate them with the normal map, the ares that shouldn't shine like cracks will stay dark.

- Generating the specular map

What specular maps basically do is adjust the intensity of the reflection on a surface. So you'll just need to adjust the brightness and contrast depending on how you want it to shine. The image below is how i made the specular map for the texture I'm using.


After generating each image, you can convert the material using the images you generated. You can see how my example looks in game in the video below.

http://www.youtube.com/watch?v=bRYeCQCG3vg#ws

You can also see how it affects the weapon models below.
Spoiler: click to open...
Last Edit: March 25, 2015, 12:14:47 pm by johndoe
broken avatar :(
×
broken avatar :(
Location: us
Date Registered: 1 January 2014
Last active: 3 years ago
Posts
397
Respect
Forum Rank
Perk Hacker
Primary Group
Member
My Contact & Social Links
More
Signature
×
vinnyz500's Groups
vinnyz500's Contact & Social Linkspsn_hackedlobbies4uXxMrPotatoxXvinnyz500
 :o great tutorial +1
broken avatar :(
×
broken avatar :(
Face to Face
Location: chSomwhere
Date Registered: 6 October 2013
Last active: 11 months ago
Posts
949
Respect
Forum Rank
The Decider
Primary Group
Member
My Contact & Social Links
More
Signature
Maya <3

Let's Play some osu!
×
MrDunlop4's Groups
MrDunlop4's Contact & Social LinksNelielexy0Nelielexy0CSMrDunlop4NelieleyNelielexy0Nelielexy0
I use the same method. But nice tut for the other mappers.

MrDunlop4
broken avatar :(
  • DeletedUser
  • Deleted Member
×
broken avatar :(
DeletedUser
This user is deleted :(
Well explained :)

This needs to be pinned to the home page
So we don't get any more of those Diffuse map only weapons..

broken avatar :(
×
broken avatar :(
Location: tr
Date Registered: 1 March 2013
Last active: 4 days ago
Posts
816
Respect
Forum Rank
The Decider
Primary Group
2015 Contest Winner
My Groups
More
My Contact & Social Links
More
Personal Quote
Caw caw caw
×
johndoe's Groups
Donator ♥ Benevolent Soul who has our eternal gratitude and exclusive access to betas and the donator section of the forum.
Community Mapper Has released one or more maps to the UGX-Mods community which have been added to the UGX Map Manager.
2015 Contest Winner
johndoe's Contact & Social Linksmyc153-johndoe
Well explained :)

This needs to be pinned to the home page
So we don't get any more of those Diffuse map only weapons..
lol thanks. but it's always best to use the original normal & specular maps on the weapons ported from call of duty franchise. but if you're talking about the weapons from other games, this tutorial might be really useful ;) in fact, let me just show you guys a few examples from my own arsenal with and without normals and speculars so that you can see how big the difference is even though the models don't originally have any normals and specs.


Last Edit: March 25, 2015, 12:29:51 pm by johndoe
broken avatar :(
×
broken avatar :(
Face to Face
Location: chSomwhere
Date Registered: 6 October 2013
Last active: 11 months ago
Posts
949
Respect
Forum Rank
The Decider
Primary Group
Member
My Contact & Social Links
More
×
MrDunlop4's Groups
MrDunlop4's Contact & Social LinksNelielexy0Nelielexy0CSMrDunlop4NelieleyNelielexy0Nelielexy0
lol thanks. but it's always best to use the original normal & specular maps on the weapons ported from call of duty franchise. but if you're talking about the weapons from other games, this tutorial might be really useful ;) in fact, let me just show you guys a few examples from my own arsenal with and without normals and speculars so that you can see how big the difference is even though the models don't originally have any normals and specs.

(Image removed from quote.)
Looks nice man. All guns have to spec and normal texture.

 
Loading ...